Monday, 13 February 2012

DreamWeaver CS5.5 Change Background Color

How to Change the Background Colour and Set a Background Image for Your Website in Dreamweaver CS5.5

by Christopher Heng, thesitewizard.com

Goal of This Chapter

By the end of this chapter, you will have changed the background colour of and/or added background images to different sections of your web page.

CSS Classes of Different Sections of Your Web Page

In the previous chapter, you learnt about CSS and how you can use it to change the font, colour, size and appearance of the text on your page. You also found out, at the end of the chapter, about some of the classes Dreamweaver had created by default for the 2-column liquid layout that your site currently uses, and made use of those classes to make changes that affect the entire left or right columns, and even the entire page.
(For those who have forgotten what CSS classes are, please refresh your memory by taking a look at chapter 3 again. If you've never even attempted that chapter, you may want to give it a shot before continuing here.)
To modify the background of different parts your web page, whether it is just to change the colour or to add a background picture, we will need to make changes to the existing classes that Dreamweaver created for that part of the page.
As such, we will need a handy reference of the class names for each of the different sections. Please take a look at the picture below.
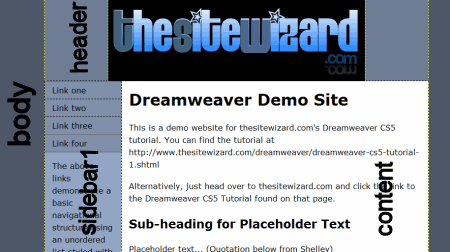
Class names and HTML tags of different sections of the 2 column layout in Dreamweaver CS5.5 for easy reference I realise that your web page, at this time, probably doesn't look like my picture any more, since you've been customising it for the last 3 chapters. However, since the basic layout of your page should still be the same, you should be able to find the parts of your web page corresponding to my picture.
Notice that I've used big words typed vertically to label different parts of the page. The top horizontal section containing your logo has the class name "header". The left column, as you may remember from chapter 3, has the class name "sidebar1". The right column belongs to the class "content". Although you cannot see it in the picture, the horizontal footer section at the bottom of your web page (scroll down your web page in Dreamweaver to see it) is assigned the class "footer".
The portion behind the left and right columns of your web page is labelled "body" in my picture above. Strictly speaking, "body" is not a CSS class at all. However, for the purpose of this chapter, since adding CSS rules for "body" will affect the background that you see in the picture, we will customise "body" in the same way we customise the other CSS classes.
Note that we will not be changing the background colour of the navigation menu (the buttons that say "Link one", "Link two", etc) in this chapter. You will learn how to customise that menu, in terms of the words that appear there as well as its colour scheme, in a later chapter of this tutorial.
There's no need to memorise any of the names in the picture. Any time you need to customise a particular part of your page, just scroll back to the picture and refer to it. These class names are specific to the 2 column liquid layout that you're using, since they have been set by Dreamweaver for that layout. If you ever use someone else's layout, it will probably not have the same class names.

For Those Who Want to Use a Background Image

If you want to use a picture to form the background of your web page, you will need to copy that picture into your local website hierarchy. For those who have followed this tutorial from chapter 2, that simply means that you will need to copy the image into the "images" folder that you can see in the FILES panel on the right side of Dreamweaver. If you will recall, you created this folder in that chapter and used it to contain your site logo and other pictures. Follow the same procedure in chapter 2 and copy any picture (or pictures) that you want to use as a background into the same "images" folder.
This is very IMPORTANT. Do not skip this step if you want to use any sort of picture on your site as a background.

Guide to Changing the Background of Your Web Page

  1. Open Your Web Page in Dreamweaver

    Start up Dreamweaver and open your home page. For those who have forgotten how to do this last part, doubleclick the "index.html" item in the FILES panel on the right side of Dreamweaver.
  2. Invoke the CSS Rule Definition for the Required Class

    As you probably know by now, to change the appearance of any part of your web page, you need to create CSS rules for that part of the page. If there aren't any pre-existing classes for that section, the job is simple: just create a new class, give it any name you like, set the rules for that class, then assign that section of your page the new class.
    If that section of the page already belongs to a class, you don't have to create a new class for it. You can just modify the existing class to contain any new rule you like. The trick, however, is to invoke the CSS Rule Definition dialog box for that particular class.
    This is where the picture above comes in.
    Let's say that you want to change the background (whether it's the background colour or to set a background image) of the part of the page labelled "body" in my picture. Click once somewhere in the empty space to the left of your left column. (Those of you who changed the font for your entire page in chapter 3 will probably remember doing this before.)
    Note: even if you don't want to change the background of that portion of your web page, please carry out this procedure, otherwise you won't know what I'm talking about. Don't worry, you don't have to change anything if you don't want to. And you can always hit the ESC key (on your keyboard) to get out of dialog boxes you invoke by mistake. Anyway, I'll tell you when to hit the ESC key for those of you who don't really want to configure the background of this part of your web page.
    After you click somewhere in the part labelled "body", the CSS STYLES panel on the right side of the Dreamweaver window should change to look something like the picture below.
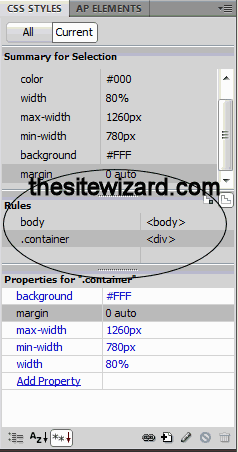
    Dreamweaver CS5.5 CSS STYLES with rules for body highlighted What we want to do is to invoke the CSS Rule Definition dialog box for "body". To do that, find the line that says "body <body>" in the "Rules" section (circled in the picture above). Doubleclick that line. It doesn't matter whether you doubleclick the first "body" word in that line or the "<body> part.
    This should cause the CSS Rule Definition dialog box for "body" to appear. You can check that you've invoked it for the correct part of your web page by verifying that the title of the window says "CSS Rule Definition for body in twoColLiqHdr.css" (emphasis mine).
    Those who don't really want to configure the background of this part of your web page (the part labelled "body" in my first picture), either hit the ESC key or click the "Cancel" button to get out of this dialog box without making any changes. (Don't do this if you actually want to change the background.)
    The procedure to change the background of some other part of your web page is similar. For example, if you want to customise the "sidebar1" background, click somewhere in the left column below the menu buttons. That is, don't click the part that says "Link one", "Link two", etc. The CSS STYLES panel on the right side of Dreamweaver will then show "sidebar1 <div>" as one of the lines in the Rules section. Doubleclick it to get the CSS Rule Definition dialog box for "sidebar1". Again, verify that you've doubleclicked the correct line by checking that the title of the CSS Rule Definition dialog box says "CSS Rule Definition for .sidebar1 in twoColLiqHdr.css".
    The same goes for the other sections of the web page. For the sake of those who aren't confident that they'll click the right places, I'll briefly mention the places to click to get the correct entries in the "Rules" section of CSS STYLES. For the header, click your site logo once. Then doubleclick the ".header <div>" line in Rules. You may have to use the scroll bar in the Rules section to scroll upwards if you don't see that line, since there are many rules for the ".header" class. For the footer, click somewhere in your footer, and doubleclick the ".footer <div>" in Rules. To configure the right column, click to put your cursor somewhere in the right column, then doubleclick ".content <div>" in Rules. Once you get the CSS Rules Definition dialog box, read the title to make sure that you've doubleclicked the correct line.
  3. Click "Background"

    Click the line that says "Background" on the left side of the dialog box. This will cause the rules pertaining to the background to be displayed in the right side.
  4. How to Change the Background Colour

    To change the background colour, click the box next to "Background-color". A colour picker window will appear. Click the colour you want.
    If you change your mind about modifying the background colour, hit the ESC key (on your keyboard) to get out of the colour picker without having to select a colour.
  5. How to Use a Picture as the Background for Your Web Page

    Before you proceed with this step, remember that any picture that you want to use on your website must be stored somewhere in your local website folder hierarchy. In other words, if you have not copied your picture so that it appears somewhere in the FILES panel, or in a subfolder that appears in the FILES panel, the following will not work. If you don't know what I'm talking about here, reread the section above on copying your images.
    Click the "Browse" button for the field "Background-image". A dialog box with the title "Select Image Source" appears. Navigate to where you stored your background image, click the picture once to select it, and click the OK button.
    Now you have to make a decision on how you want the image to appear on the page should the picture be smaller than the space available for it on your web page. Click the down arrow for the drop-down box next to the "Background-repeat" field.
    If you select the "no-repeat" option, your image will appear on your web page in its actual size. The rest of the space around the picture will continue to be blank. If you select "repeat", and your picture is smaller than the space available for it in your visitor's web browser window, it will be tiled to fill the space. By "tile", I mean that duplicate copies of that picture will be placed side-by-side like the tiles on the floor. The "repeat-x" option means that the picture will only be tiled horizontally, and the "repeat-y" option means that it will only be tiled vertically. And before you ask, there is no "stretch" option to make your picture fill the entire space.
    (Note that leaving the "Background-repeat" option blank means that the default of "repeat" will be used.)
    It's also possible to make the image appear at a specific position in that section. To do this, set the "Background-repeat" field to "no-repeat" and place a coordinate (ie, a number) in the "Background-position (X)" and "Background-position (Y)" field. As a point of reference, X is the horizontal coordinate, and Y the vertical, with a coordinate of X=0 and Y=0 referring to the top left corner of the page. If you click the drop-down arrow for the "Background-position (X)" field, you will see that you can also specify a relative position of "left", "right" and "center", where your picture will be placed on the left of the page, the right of the page or in the centre respectively. Similarly, the drop-down fields for "Background-position (Y)" allow you to place the picture at the "top", "bottom" or "center" of your page.
    Once you've finished making your changes, click the "OK" button.
Note that you can change both the background colour and set a background image. That is, they are not either-or options. Of course if you set a background image to "repeat", then you won't be able to see the background colour you selected since your picture will overlay the whole of the background for that section.

How to Modify Your Changes If You Make a Mistake

If you modified the background of your page, and change your mind, simply repeat the above procedure. That is, click the relevant part of your web page so that the CSS STYLES panel show the rules you want, and doubleclick the rules to get the CSS Rules Definition dialog box.
To change the background image, you can then simply select a new picture. If you change your mind and don't want any picture after all, just delete the words in the "Background-image" field. (That is, click to put your text cursor in the field, and use the backspace or DEL key to get rid of anything in that field.)
The same procedure will also allow you to change the background colour. (That is, just click the colour picker box and choose a new colour.)

How to Change the Background for the Space Directly Underneath the Content and Sidebar

While it's possible to change the colour of the background for the right and left columns, you'll probably have noticed that the colour change does not appear complete. That is, the colour extends as far as you have content for that column, but the portion underneath those columns that don't have any words or pictures remains white.
This is because the right and left column CSS classes lie on top of another CSS class called "container" and the background colour for the "container" class is by default white. To change this, click your mouse once somewhere in that space, that is, the part that is still white in spite of your colour changes to the left and right columns.
Then in the CSS STYLES panel, doubleclick the ".container <div>" line. This will invoke the CSS Rules Definition dialog box for the "container" class, allowing you to change the background colour for that section as well.

Save, Upload and Test

When you're satisfied with your changes, click "File | Save All" to save both the HTML file and the changes Dreamweaver made to the CSS file. Then publish your site, making sure to click "Yes" to the "Put dependent files" prompt.
Now access your site on the Internet in a web browser. This is important because it will show you whether your changes actually look good in a real web browser. It will also allow you to make sure that you've actually copied your background images into the correct folder, and saved and uploaded all your changed files. If the background images are not displayed on your site, or the colours are still the old colours, it means you've failed to do some of the steps I mentioned above. To solve it, go back and redo this chapter. (That's why you need to check now, so that the things you need to redo is limited to the small changes you've made here. If you wait till the last chapter to check, you'll have a lot of things to fix, and you'll end up giving up in despair.)
If everything looks fine, congratulations! Your web page now contains both your unique content and a customised appearance. Yes, I know it's still not complete, but if you think about it, even as it stands, you've come a long way since that blank window you first encountered in Dreamweaver.

Next Chapter

We'll deal with the all-important hyperlinks in the next chapter, where you will learn how to make your pictures and words into clickable links.

DreamWeaver CS5..5 Change Font

How to Change Fonts, Text Size and Text Colour in Dreamweaver CS5.5

by Christopher Heng, thesitewizard.com

Goal of This Chapter

By the end of this chapter, you will have modified the text on your web page so that it has the appearance you want. This may be through the changing of fonts, the text size or colour, or putting text in bold or italics, or any combination of those things. You will also learn what Cascading Style Sheets (or "CSS") means, and how you can use it to style the appearance of your website.

Introduction to Cascading Style Sheets

If you have been following this tutorial from chapter 1, you would have already encountered this mysterious "CSS" thing numerous times. For example, you created and saved a CSS file called "twoColLiqLtHdr.css" in chapter 1 and used the "CSS Rule Definition" dialog box to centre ("center") your website logo in chapter 2.
Strictly speaking, it's possible to create your website using Dreamweaver without ever learning what CSS means or how it works. After all, that's the whole point of using a visual editor like Dreamweaver: it insulates you from the technical details. However, I find that webmasters are generally very much better off when they have at least an inkling of what goes on behind the scenes on their web page. It makes some of the things you need to do more logical and therefore more comprehensible, and when things go wrong, you'll have a better idea of how to fix it.
CSS, as I'm sure you've already inferred from the title of this section, stands for "Cascading Style Sheets". It is the technology that Dreamweaver uses to control the appearance of your web page. CSS is used to make your web page appear in 2 columns. It is used to position your site logo in the centre. And it will be used to change the appearance of your text. In other words, the "style" in "Cascading Style Sheets" has to do with visual style, the same way we use "style" when we say, "that person's very stylish".
You don't normally get to see the actual CSS code that Dreamweaver creates when you change the appearance of your web page. The code is created behind the scenes and inserted into the "twoColLiqLtHdr.css" file (for those who have followed my tutorial from chapter 1).
For this reason, you must always use the "File | Save All" menu (as taught in chapter 2) to save your web page whenever you do anything that alters the visual appearance of your page. If you use "File | Save" instead, Dreamweaver will only save the HTML file you currently have open in your editor and not your CSS file as well. This is also why you must click "Yes" when Dreamweaver pops up the "Put dependent files" dialog box during a "Site | Put" operation. The CSS file is considered a dependent file by the web editor, since the appearance of your main page depends on this file. Not doing this results in a problem that some newcomers find puzzling, where your website looks correct in Dreamweaver, but when you surf to it on the Internet, it has the new content you added (the words you added to your page) alongside its old appearance.
The lines of CSS code created by Dreamweaver are known as "CSS rules". They are rules in the sense that web browsers are obligated to follow those rules when they render (ie, display) your web page. For example, when you centred your logo in chapter 2, you created a rule that ordered the web browser to leave an equal amount of space on either side of the logo, which of course has the effect of putting your logo in the centre of the page.
CSS rules can be applied to anything on your web page to change its default appearance. To make it easier to apply a CSS rule to an element on the web page, we usually label the element we want to change with some arbitrary name. That way, we can easily refer to that specific object by name in our CSS rule. We call such labels "classes" in CSS.
For example, in chapter 2, we gave a label of "logo" to your site logo by selecting "logo" in the Class field of the PROPERTIES panel. We also created a CSS rule to centre any picture that has a class name (label) of "logo".
Yes, I know what you're thinking here. The above paragraph is a bit of revisionist history. The truth is that we actually created the CSS rule first, and only later did we assign the class to the logo. In fact, this seemingly backwards way of working, where we create the rule for the label first, then label the object later, is what we will usually do in Dreamweaver, because it makes our job easier.
Incidentally, this "element" or "object" that I've been talking about, that you can make rules for, can be anything on your web page. It can be a picture, a word (or just a letter of a word), a paragraph, the left or right columns, or even the entire page. You can even assign many different objects the same label (class).
Don't worry if the above is a bit confusing. Things will clear up as we carry out the steps below. This section is meant to be a sort of theoretical overview of what we're about to do. It also serves to explain why we'll be doing things the way we do. If you're having difficulty visualising what I just said, don't bother (to visualise), and just move on to the next section.

How to Change Fonts, Set Text Size and Colour in Dreamweaver CS 5.5

  1. Start up Dreamweaver and open the "index.html" file that you've been working on for the previous 2 chapters. To do this, doubleclick the line that says "index.html" in the FILES panel on the right side of the Dreamweaver window. (You can, of course, skip this step if you already have your web page open in Dreamweaver. For example, if you didn't quit Dreamweaver or close your file after you completed chapter 2, just go on to the next step.)
  2. Click "Format | CSS Styles | New..." from the menu. If you will remember from previous chapters, this means to click "Format" from the menu bar, followed by "CSS Styles" on the drop down menu that appears, and finally "New..." in the submenu that pops out.
    This invokes the "New CSS Rule" dialog box that you have already encountered in chapter 2. Another method to get this dialog box is to click the icon that you used in that chapter. You'll find that there are many ways to accomplish the same thing in Dreamweaver (as there are in other computer programs). It doesn't matter which route you take, that is, using the menu that I mentioned in the paragraph above, or clicking the icon that I taught in chapter 2. Both have the same end result (and neither is better or worse than the other). (If this paragraph confuses you, just skip it and move on.)
  3. When the "New CSS Rule" dialog box appears, click the down arrow for the "Selector Type" field and choose "Class (can apply to any HTML element)". Chances are that it's already selected by default, but if you're not sure, there's no harm doing it again just in case.
    Selecting this field tells Dreamweaver that we're creating CSS rules for a new class. (This "class" is the label that we discussed earlier.)
  4. If there is any text in the "Selector Name" field, delete it. You can delete it by simply putting your cursor in the field (by clicking your mouse there) and using the backspace or delete key.
  5. Click the "Selector Name" field once to put your cursor there. We'll now be entering some word or other into this field. Remember that I mentioned earlier that we can label objects on your page with some arbitrary name, and then create rules for those objects? Well, we're now about to come up with one of those arbitrary names for your label (technically, "class").
    To make what I'm about to talk about easier to understand, we'll use a concrete example. Let's say that you want to make the names of all the products you're selling appear in the Times New Roman font on your web page. To do that, you'll create a rule for a class (label) called "productname". Then you'll search through your entire web page for every occurence of the name of a product and attach the "productname" class to it.
    For such a case, you'll want to enter "productname" (without the quotes) into the "Selector Name" field. This tells Dreamweaver that you're creating a rule for a class called "productname".
    Of course "productname" is just a name I came up with for my example here. You don't actually have to use the word "productname" for your class. It can be any name you like. The name, however, must begin with a letter of the alphabet. You can use letters and numbers for the rest of the name, but do not use any punctuation marks or spaces. For example, "productname" and "welcomemessage" are acceptable names of classes, but "product name" and "welcome message" are not (since they contain spaces).
    Experienced webmasters usually give a name that describes the content that they'll be labelling. For example, most consider a class name of "productname" for your products a better one than a class name of "timesnewromanfont", even if you currently plan to put all your products in the Times New Roman font. The "productname" class name is more future-proof, in that it'll still be a descriptive class name should you ever decide that your product names should use a different font, like Arial.
    In any case, once you've decided on a name for your class, enter it into the Selector Name field. Don't waste too much time coming up with the name. It's just a descriptive label to make it easy for you to change fonts and stuff like that, so don't lose sleep over it. If you really have no idea what to put here, just use generic class names like "companyname", "productname", "welcomemessage", "productfeatures", "subheadings", etc.
  6. At the bottom of the dialog box, the field "Rule Definition" should contain "twoColLiqLtHdr.css", which is the CSS file you created in chapter 1 for your web page. If it doesn't say that, click the down arrow for that field, and select "twoColLiqLtHdr.css" from the drop down box.
  7. Click the "OK" button.
  8. Another dialog box should appear. I shall refer to this as the CSS Rule Definition dialog box, although the title of the dialog box will probably be something like "CSS Rule Definition for .productname in twoColLiqHdr.css" (where ".productname" will be replaced by whatever name you entered earlier for the Selector Name field).
    There are two columns in this dialog box. In the Category column, on the left, "Type" should be selected. If it is not, click it once to select it.
    Now look at the right column. Notice that the right column allows you to change a number of things: the font (through the "Font-family" field), the font size (through the "Font-size" field), the font-weight, font-style, text colour (through the "Color" box) and so on. You can even set the text so that it appears underlined (the "underline" checkbox), has a line cutting through the centre ("line-through"), etc.
    Before you go berserk changing those fields, please read on.
  9. Font-family, List of Fonts and Available Fonts

    If you were to click the drop-down arrow for the "Font-family" field, you'll notice that Dreamweaver pre-fills the drop down list with some default font combinations, and provides an additional item called "Edit Font List..." where you can add even more fonts to the list.
    (Please click the drop-down arrow now to see what I mean. Don't worry. If you don't want to select anything, you can just click the same drop-down arrow again later to close the list without choosing anything. But for now, open up the list, otherwise you won't understand what I'm talking about.)
    Examples of font combinations listed in the drop down box are "Verdana, Geneva, sans-serif" and "Arial, Helvetica, sans-serif". Multiple fonts are listed in each selection (eg, "Arial, Helvetica, sans-serif") because there is no guarantee that your visitor's computer will have any one of the fonts listed (ie, either "Arial", "Helvetica" or a sans serif font for the example given). If a web browser cannot find the first font on your visitor's computer (eg, Arial), it will display your words using the second font listed (eg, Helvetica). If that fails, it will use the third font (eg, any sans serif font), and so on. If it exhausts the list without finding any relevant font, it will just use some default font that exists on that computer, even if it is not specified in the list.
    This has at least 2 implications for the way you select fonts for your website.
    Firstly, if you really prefer your page to be displayed in, say, the Times New Roman font, you should choose the line "Times New Roman, Times, serif" instead of "Georgia, Times New Roman, Times, serif" since Times New Roman occurs as the first item in the first list, and only as the second choice in the other. If you use the second list, your page will always appear in the Georgia font on computers with both Georgia and Times New Roman installed, which was probably not your intention. In other words, if you prefer your page to be displayed in a specific font, make sure that font appears first in the list of fonts that you use.
    Secondly, if you use the "Edit Font List..." item to add new fonts to the list, be aware that if you add a font that only few people have on their computers, your web page will be displayed using some other font on the majority of your visitor's computers. For example, if you have installed a fancy font from, say, thefreecountry.com's Free Fonts page, and decided that you want your page to use that font, remember that most of your visitors will not be able to see your page with that font, since it's unlikely that they'll have it on their system too. Instead, your page will probably appear in the Times New Roman font (the default font for many web browsers on Windows systems) for most visitors. Bear that in mind when you choose fonts for your web page.
    For those who are curious, since your web page is using the two column liquid layout from Dreamweaver, it has a default font series of "Verdana, Arial, Helvetica, sans-serif". And so that you don't have to write to ask me, thesitewizard.com currently uses "Arial, Helvetica, sans-serif". Both these sets of fonts are used by many webmasters because they contain at least one font that is installed on practically every Windows and Macintosh computer. As such, they are regarded as safe bets.
    In any case, if you wish to change the font from the current default of "Verdana, Arial, Helvetica, sans-serif", just choose the appropriate item from the list in the drop down box.
  10. How to Change the Font Size

    As I'm sure you've noticed, the "Font-size" option (just underneath the "Font-family" field) has two boxes, side-by-side. The first box is supposed to contain a number, and the second box the unit of measure.
    For example, if you want the text on your page to be 20% bigger than its current size, enter "120" (without the quotes) into the first box. This activates the second box, which was previously disabled. Click the drop-down arrow for the box and select "%" from the list.
    Other units of measures are available, including "px" which stands for pixels, "pt" which is short for "point", "em", and the usual units like "in" (inches) and "cm" (centimetres). In spite of this, it's probably best to stick to relative units like "%" and "em" for web pages. The other units like "pt" (which you may be familiar from using wordprocessors), "cm" and "in" are better suited to the printed media. If you're using "%" as the unit, "100%" refers to the current text size (whatever it may be). Therefore 110% means that the text will be 10% bigger than the current size, and 80% means that it will be 20% smaller than the current size.
  11. How to Change the Text Colour

    To change the colour of the text on your page, click the box beside the word "Color". This box is actually a clickable button. A colour picker window will open, allowing you to click to choose a colour.
    (If you change your mind about changing colours, and want to get out of the colour picker without clicking a colour, just hit the ESC key on your keyboard.)
  12. How to Put Text in Bold or Italics

    To put text in bold, click the down arrow key for the "Font-weight" field and click "bold". To put text in italics, click the "Font-style" field and select "italic". If you want to put your text in both bold and italics, do both.
    Having said that, you don't need to use the above technique if all you want to do is to put an isolated word or phrase in bold or italics, such as if you just want to emphasize a particular word in the sentence. Creating a new CSS rule for such a purpose is a bit of an overkill. For such occasions, please see the section below on how to create the one-off bold and italics text.
    However, if there is a particular recurring word or phrase that you always want to put in bold, using a CSS rule (like what we're doing in this section) is a good idea, since it will give you greater flexibility in the future.
  13. How to Underline Text

    I'm sure you've noticed the "underline" checkbox in this dialog box and have realised that you can underline text simply by checking this box. However, unless you have a good reason for it, it's generally preferable not to underline any text that is not also a link. Over the years, internet users have come to expect that any underlined text they encounter represents a clickable link. Maintaining this convention on your web page is usually considered good practice, since it will allow your visitors to have an easier time navigating your website. If you want to emphasize something, use bold or italics instead.
  14. When you've finished with your changes, click the "OK" button.
    The dialog box will disappear. You'll probably be disappointed to see that nothing on your web page has changed. This is because you've only created the CSS rule for a new class, but you have not assigned that class to anything on your web page yet.
  15. To apply your changes to a piece of text on your page, first select it. If you've forgotten how to select something on your page, just drag your mouse over the word (or words) to select it. In case you've also forgotten what "drag a mouse" means, click the left mouse button when it's hovering the start of the word (or words) that you want to select, then, while holding down the button, move the mouse over the rest of the word or phrase. The word or words that you selected will be highlighted on the page.
    Don't click or do anything else on the page (or the selection will be removed, and you'll have to redo this step again). Just go on to the next step.
  16. Click the "Class" field in the PROPERTIES panel at the bottom of Dreamweaver. A list of class names will appear. You should be able to find the name of the class you just created in that list. Click it.
    For example, if you just created a class called "productnames", click the word "productnames" in the list that pops up.
    The selected text will immediately take on the characteristics you defined earlier. Of course, if you make modifications that are very small (like changing the font size from 100% to 101%), the change may not be sufficiently distinct for you to notice any difference (assuming that the computer can even render a difference of 1% in font size).
  17. If you have other pieces of text (eg other product names) that should have the same class, just repeat the procedure: select the text, click the class field in the PROPERTIES panel and select the appropriate class. Remember from the CSS introduction above that you can give any number of elements on your page the same class. Every piece of text that you label with that class will take on the characteristics you defined in the CSS rule earlier. This is handy if you want, say, all your product names to be displayed using a particular font.
  18. If you want a different visual style for some other block of text, you'll have to create a new rule for it. That is, go back to the step where you used "Format | CSS Styles | New..." to make a new class, and carry on from there, this time assigning different fonts, text sizes, colours, etc, according to your preference.

How to Modify an Existing CSS Rule: For Those Who Have Changed Their Minds About the Font, Colour, Size, etc

After looking at your web page with the new changes, you may decide that the new font selection (or changes to the text size, colour or whatever) doesn't really produce the effect you wanted. To change the rules for a particular class, do the following.
  1. Put your text cursor somewhere in a block of text that has the CSS rule you made earlier. For example, if you created a rule called "productname" and assigned it to the words "Widget XYZ" on your page, click your mouse when the cursor is hovering over the words "Widget XYZ". Do not select the word. Just click the mouse once. This will deposit your text cursor somewhere in the word(s). It's best not to put the cursor at the beginning or end of the word, in case you accidentally position it outside the block of text assigned to the class. To verify that you have indeed placed the cursor in a block of text governed by your CSS rule, look at the PROPERTIES panel at the bottom of Dreamweaver. You should see the name of the class you want to change displayed in the "Class" field.
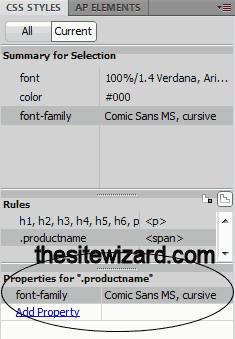
  2. CSS STYLES in Dreamweaver CS5: properties for current class highlighted Now look at the right hand side of the Dreamweaver window, at the CSS STYLES panel (see picture). Locate the part of the panel that says "Properties for .[your class name]" where "[your class name]" is the name of your class. For example, if your class is called "productname", look for the section with the heading "Properties for .productname".
    (If your Dreamweaver window or computer monitor is small, and you cannot really see very much of this section, click the scroll bar at the side of the "Properties for .[your class name]" section to move its content up or down. Note that you will not see a scroll bar if your window is big enough, since there will be nothing to scroll.)
    To modify a particular field in the panel, just click the value portion of the field. For example, if you have set your product name to be displayed in the Comic Sans font, you should be able to see a line that starts with "font-family" with a value of "Comic Sans MS... (etc)". In such a case, click the "Comic Sans MS..." part. This will change it into an editable drop-down field. You can either click the drop-down box to select some new value, or type in your changes manually. Of course my use of "font-family" here is just an example. If you have set the font size, you'll see "font-size" here instead, in which case, you'll have to click the number beside "font-size" to make the field modifiable. And so on.

How to Make Changes that Affect the Entire Web Page, or the Whole Left or Right Columns

If you are planning to change the font (or text size, or colour, etc) for the entire web page, or for everything in the left or right column, it's more efficient to make your changes directly to the class Dreamweaver created for that section instead of creating a new class and manually selecting everything.
Everything on the page of the 2 column liquid layout that we're using is assigned the overarching class called "container". The left column is assigned the class "sidebar1" and the right column "content". Hence if you want to change something that only affects the left column, but everything in that column, you'll need to change the CSS rules for the "sidebar1" class. Likewise, to do something that affects the entire right column, change the rules for the "content" class. And if you want something that affects the entire web page, modify the "container" class.
Here's how you can do this.
  1. If you're planning to change some text characteristic for the entire web page, click somewhere in the blank space to the left of your left column. Yes, to the left, in the empty part that appears to be some deep shade of blue. (Sorry, I don't know enough colour names to be able to name that colour, assuming that shade even has a specific name.)
    If you're planning to change the text appearance for your left column, click somewhere in the left column.
    Likewise, if you want to change the font, text size or whatever, of your right column, click somewhere in the right column.
  2. The picture below shows the CSS STYLES panel when you click somewhere in the blank space to the left of the left column.
    Dreamweaver CS5.5 CSS STYLES with rules for body highlighted Notice that the "Rules" section (circled in the picture) has two lines listed, "body" and "container".
    If you clicked the left or right column, you will have a much longer list of items in the "Rules" section, so much so that you won't be able to see everything. In such a case, scroll up (by clicking the up arrow in the scroll bar at the side of the Rules section) till you see the top 3 lines. For the left column, you will see "body", "container" and ".sidebar1". For the right column you'll see "body", "container" and "content".
    As you've probably guessed, "container", "sidebar1" and "content" are the same classes I mentioned earlier which Dreamweaver created for this 2 column layout that you're using.
  3. To configure font settings (ie, the font used, the text size, colour, bold, italics, etc) for the entire web page, doubleclick "container" in that list. To configure it for your left column, doubleclick "sidebar1". Those who want to change settings only for the right column, doubleclick "content".
  4. The CSS Rule Definition dialog box for the class you doubleclicked will appear. This is the same dialog box you encountered earlier. The title of the dialog box will show which class you're setting rules for. For example, if you doubleclicked "container", the title will be "CSS Rule Definition for .container in twoColLiqHdr.css".
    Click "Type" in the left column of the dialog box to make sure you're in the font section, and modify the right side so that it has the settings you want. The dialog box is exactly the same as what you've encountered earlier, so everything I mentioned above applies here.
  5. When you're done, click the "OK" button.
  6. Everything in the part of the page you've configured should change immediately. For example, if you've modified the "content" class, everything in the right column will immediately have your new text settings. Or, if you've changed the "container" class, the text on your entire page will take on the characteristics you've just set.

How to Emphasize Text (Bold and Italics) Without Creating a CSS Rule

To emphasize text without creating an entire CSS rule, first select the piece of text you want to emphasize. In the PROPERTIES panel (at the bottom of the Dreamweaver window), notice that there are 2 characters, "B" and "I", to the right of the Class field. These are actually clickable buttons. Click the "B" to put your text in bold or "I" to put it in italics. The changes should show immediately.
Another way to put text in bold or italics is to use the Ctrl+B and Ctrl+I keyboard shortcuts that you are used to from Microsoft Word and other word processors. Those work exactly the same way in Dreamweaver as they do in the word processors. Note: if you don't understand this paragraph, just ignore it and use the method suggested earlier; that is, click the relevant buttons in the PROPERTIES panel instead. They result in the same thing happening.

Save and Publish Your Web Page

Now that you've finished styling your text, save your work with "File | Save All". Again, notice that I said to use "File | Save All" and not "File | Save", since your work in this chapter would have modified both the HTML file as well as your CSS file.
Then upload your work to your website with "Site | Put". When Dreamweaver asks you whether it should upload dependent files, make sure you click "Yes", otherwise the changes to your CSS file will not be published.
Be sure to use a web browser to surf to your site, to check the changes. This is important because it will tell you whether you've actually saved all your files (including the CSS file) and uploaded all of them to your site (instead of just the HTML file). It will also let you see your work in a real web browser rather than just a web editor. That is, don't assume everything works just because things look good in Dreamweaver.

Next Chapter

With your web page now containing both graphics and text styles, it is well on its way to being complete. There's still more work to be done, of course.