Wednesday 10 December 2014

All the best

My dear students, Friends and blog followers,

Thanx for ur support. I hope this blog can little bit help to your career.

    I will share new technology and new concepts in a quick time.

 This is a comma but not a fullstop.


Yours

Hanumantha Rao

Saturday 15 November 2014

Routing in MVC

Routing within the ASP.NET MVC framework serves two main purposes:

  •  It matches incoming requests that would not otherwise match a fi le on the file system and maps the requests to a controller action.
  •  It constructs outgoing URLs that correspond to controller actions.

The preceding two items describe only what Routing does in the context of an ASP.NET MVC application. 

NOTE: 
 One constant area of confusion about Routing is its relationship to ASP .NET MVC. In its pre-beta days, Routing was an integrated feature of ASP.NET MVC. However, the team saw that it would have a useful future as a fundamental
feature of ASP.NET that even Web Pages could build on, so it was extracted
into its own assembly and made part of the core ASP.NET framework. The
proper name for the feature is ASP.NET Routing, but everyone simply shortens
it to Routing.
Putting this feature into ASP.NET meant that it became a part of the .NET
Framework (and, by association, Windows). So, while new versions of
ASP.NET MVC ship often, Routing is constrained by the schedule of the larger
.NET Framework; hence, it hasn’t changed much over the years.
ASP.NET Web API is hostable outside of ASP.NET, which means it can’t use
ASP.NET Routing directly. Instead, it introduces a clone of the Routing code.
But when ASP.NET Web API is hosted on ASP.NET, it mirrors all the Web API
routes into the core ASP.NET Routing’s set of routes. Routing, as it applies to
ASP.NET Web API

Comparing Routing to URL Rewriting
To better understand Routing, many developers compare it to URL rewriting. After all, both approaches are useful in creating a separation between the incoming URL and what ends up handling the request. Additionally, both techniques can be used to create pretty URLs for Search Engine Optimization (SEO) purposes.
The key difference is that URL rewriting is focused on mapping one URL to another URL. For example, URL rewriting is often used for mapping old sets of URLs to a new set of URLs. Contrast that to Routing, which is focused on mapping a URL to a resource.
You might say that Routing embodies a resource-centric view of URLs. In this case, the URL represents a resource (not necessarily a page) on the Web. With ASP.NET Routing, this resource is a piece of code that executes when the incoming request matches the route. The route determines how the
request is dispatched based on the characteristics of the URL — it doesn’t rewrite the URL.
Another key difference is that Routing also helps generate URLs using the same mapping rules that it uses to match incoming URLs. URL rewriting applies only to incoming requests and does not help in generating the original URL.
Another way to look at it is that ASP.NET Routing is more like bidirectional URL rewriting.
However, this comparison falls short because ASP.NET Routing never actually rewrites your URL.
The request URL that the user makes in the browser is the same URL your application sees throughout the entire request life cycle.

Saturday 4 October 2014

Page development in Sharepoint


Bydefault Sharepoint server has two types of pages. 1.Page(Wiki) 2.Web Part Page

1.Page: This is a normal wiki page. In this page we can add text, images, links, ..
2.Web Part Page : This is also a page but here we can't create any text. Only for adding webparts to the page.

We have another type of page is called Publishing page. This is the combination of both page and webpart. If we want to create publishing page means first we should show this option in page list like below.

SiteActions --> SiteSettings --> SiteActions --> ManageSiteFeatures -->  SharePoint Server Publishing ----> Activate. Now you will find the option Publishing page.


==================================

Webpart Page
SiteActions --> MoreOptions --> Page ---> Web Part Page ---> Create --> 
i.Name : SPDemoPage .... Check/uncheck :Overwrite if file already exists? 

ii.Layout : Select a layout template to arrange Web Parts in zones on the page. Multiple Web Parts can be added to each zone. Specific zones allow Web Parts to be stacked in a horizontal or vertical direction, which is illustrated by differently colored Web Parts. If you do not add a Web Part to a zone, the zone collapses (unless it has a fixed width) and the other zones expand to fill unused space when you browse the Web Part Page.
   Choose any one layout template. 
Ex.Header, Footer , 3columns  / Full page, Vertical / Header leftcol, body 

iii.Save Location : Select the document library where you want the Web Part Page to be saved.  choose any one of the following
SiteAssets / Shared Documents / SitePages

A new webpart page will be opened. now you can add webparts by click on Add a web part. 
After adding webparts to the page then click on Stop Editing option. Now page is ready.
*While adding webparts you can also drag webparts from one place to another place.

Web part  zone is like div tag in asp.net / html.
We can add / delete or move webparts from one place to another place.

Publishing Page
This page is the combination of wiki page and web part page. We have 5 types of publishing pages available. Those are
1.Articles 
2.Wiki Page 
3. Project 
4. Redirect 
5. Welcome

SiteActions --> MoreOptions --> Page ---> Publishing Page --> Create --> 
1.Page Title and Description : Enter a URL name, title, and description for this page.   

2.Page Layout : Select a page layout to control how the page will be displayed. 
  i.(Article page) body only: The article page with body only contains a rich text field.
 ii.(Article page) Image on left : The article page with image on left contains an image field and a rich text field
iii.(Article page) Image on right :The article page with image on right contains an image field and a rich text field.
iv.(Article page) Summary Links : The article page with links contains an image field and summary links. 

v.(Enterprise Wiki Page) Basic page:A basic page layout containing a single content area.

vi.(Project Page) Basic Project Page:A basic page layout containing a single content area.

vii.(Redirect Page)Redirect : This page layout contains a redirect control for automatically directing readers to any specified URL.

viii.(Welcome Page) Blank Web part page: Page layout for creating web part pages
ix.(Welcome Page)Splash : The welcome with splash contains an image field on left, a rich text field and Web Part zones arranged in a header, and 2 columns.  The left navigation pane is hidden.
x.(Welcome Page) Summary Links :The welcome page with summary links contains an image field on left, a rich text field, 2 summary links, and Web Part zones arranged in a header, a footer, and 2 columns.
xi.(Welcome Page) Table of contents: The welcome page with table of contents contains an image field on left, a rich text field, a table of contents Web Part, and Web Part zones arranged in a header, a footer, and 2 columns.

Click on Create.
Now you can add text, images ..... after completion of creating Save the page then click on Publish --> Publish ---> Enter any comments if ... Continue click

While you are developing the publishing page its status is 'Checked out' Means it is under design. So no one cant access this page. 

Like you can create all publish pages of enterprisewiki, basic project page, redirect page and welcome page.

============================================================

Tuesday 23 September 2014

Sharepoint Realtime Interview questions

Important interview questions for Sharepoint Developer
Q. How will you deploy files such as Css, js in SharePoint 2010?
Ans. The most preferable way to deploy files in SharePoint is by using the solution package. In SharePoint 2010 you can create an empty project with VS 2010 and then add a new SharePoint Mapped folder  in it. This will give the desired location in 14 hive where you can then add a file to deploy.

Q. Can you display a page as a modal dialog?
Ans. Yes, any page can be displayed as modal dialog. A Modal dialog takes options as a parameter and we can speciy the url for any page usually saved in _layouts.

Q. Can you display the modal dialog from a webpart?
Ans. Yes a modal dialog can be displayed from within a webpart code since its a JavaScript block that can be registered on the page.

Q. What is difference between an Application page and a Custom aspx page in SharePoint 2010. If you have to deploy a page with some code in it which one would you prefer?
Ans.
Application Page – You would typically use an applictaion page when you need some content that is merged with SharePoint master page. A master page enables application pages to share the same appearance and behavior as other pages on a site. Application page generally gets deployed in _layouts and inhertirs the look and feel of the site that you are using.
A Custom .net aspx page on the other hand would need content and master page tags in your page to make it inherit the look and feel of the site.
I would prefer deploying an application page with code as it is much easier and has built-in templates available in VS 2010.

Q. What is Docuement Set and how is it useful to the end users?
Ans. A Document Set is a group of related documents that can be created in one step and then managed as a single entity. This can be seen as a folder of documents with a cover letter(welcome page) and which can share common data between its documents (share document set info\columns).
Document Set is very useful when it comes to managing the documents for a single project or task. For e.g. a manager while working on a project wants to create a single folder\entity with all the documents related to that project. He also wants that each document shares the project info (for e.g. Project Id, Manager name etc.) and can be checked in\checked out individually. Document Set will also allow him to add a cover letter\welcome page to the entity(or his set of documents) and use some basic document features like record version history, start a workflow, e-mail document set etc.

Q. What are Projected Fields in SPQuery and when would you use that?
Ans. In SharePoint 2010, Referential integrity can now be implemented using Lookup columns. Joins and ProjectedFields properties of SPQuery were introduced to facilitate this. Projected Fields are the fields which you can access when a list is joined by a lookup columns. These are additional columns from a parent lookup column list.

Q. What is WebProvisioned event receiver and when would you use that?
Ans. WebProvisioned event receiver is fired after the site has been created and is fully provisioned(asynchronous). For e.g. if you want to update the site title of logo after its been created or if you want to add a new list\library after the out-of-box site has been created you can use the WebProvisioned event handler.

Q. If you have to add a new Ribbon button to one of the existing tabs how will you identify the location?
Ans. The Its typically Ribbon.Tabs.group.Controls._children.

Q. How does Client object model works ?
Ans. When we use SharePoint client API’s to perform a specific task, the SharePoint Foundation 2010 managed client object model bundles up these uses of the API into XML and sends it to the server that runs SharePoint Foundation. The server receives this request, and makes appropriate calls into the object model on the server, collects the responses, forms them into JavaScript Object Notation (JSON), and sends that JSON back to the SharePoint Foundation 2010 managed client object model. The client object model parses the JSON and presents the results to the application as .NET Framework objects (or ECMAScript objects for ECMAScript).

Q. How many types of Client Object model extension are available in 2010 and when would you use one or the other.
Ans. To develop rich client side solutions, three set of client-side APIs has been introduced in the Microsoft.SharePoint.Client namespace. The three APIs are targeted for three different types of clients.
1. .net Managed applications – These are used when we have to create console applications or window applications, web applications which are not running inside SharePoint Contex.
2. For Silverlight applications
3. ECMAScript – It is a client object model extension for using with JavaScript or JScript. This is used for creating applications which are hosted inside SharePoint. For example, web part deployed in SharePoint site can use this JavaScript API for accessing SharePoint from browser using JavaScript.

Q. What is difference between Load() and LoadQuery() methods ?
Ans. Load method populates the client object directly with what it gets data from the server i.e. a collection object like ListItemCollection etc. but LoadQuery returns the data as a completely new collection in  IEnumerable format. Other major difference is that the Collections that you load using the Load() method are eligible for garbage collection only when the client context variable itself goes out of scope where as, in  these collections go out of scope at the end of  IEnumerable<List>list.

Q. How can you write efficient and better performing client object applications ?
Ans. You can always use Lambda expressions in your queries to return only specific properties that will be used in your block. You can also use LoadQuery() method and specify multiple levels of properties to load for e.g. while returning specific properties of the lists using LoadQuery(), you can also specify the fields to return from each list to optimize the data access.

Q. How do you access ECMAScript object model API’s ?
Ans. The ECMAScript library is available in a number of JS files in the LAYOUTS folder. The main file among number of .js files is SP.js. When you include this file in the APSX page using a ScriptLink control, all other required JS files are loaded automatically. By linking SP.js to your page, the SP namespace gets registered. SP is the SharePoint namespace that contains all objects. For debugging purposes every js file also has a ‘debug’ equivalent in the same folder.

Q. What is the purpose of calling clientContext.ExecuteQuery() ?
Ans. ExecuteQuery gives you the option to minimize the number of roundtrips to the server from your client code. All the components loaded into the clientcontext are executed in one go.

Friday 22 August 2014

SharePoint 2013

Welcome to the world of SharePoint 2013. SharePoint 2013 Production version is released & Live implementations are going on. In this article I would like to re-iterate the features of SharePoint as a whole & advantages of going with it.

Sharepoint Features
Depending on the business perspective the features of SharePoint are many:

How to Install SharePoint 2013?

As SharePoint is a server side software, it requires the Windows Server operating system. You can start with a new installation or use a Virtual Machine. Once you have the Operating System ready, you can download and install SharePoint 2013 from the following link: http://technet.microsoft.com/en-us/evalcenter/hh973397.aspx .

Hardware Requirements

Following are the core hardware requirements:
  1. CPU 64-bit
  2. RAM 8 GB
  3. HDD 80 GB

Software Requirements

Following are the software requirements:
  1. Windows Server 2012
  2. Microsoft SQL Server 2012 64-bit
  3. Internet Information Services 7.5
  4. Microsoft .NET 4.5

Friday 18 July 2014

Routing MVC 4

Routing
·         All ASP.NET MVC traffic starts out like any other website traffic: with a request to a URL. This means that, despite the fact that it is not mentioned anywhere in the name, the ASP.NET Routing framework is at the core of every ASP.NET MVC request.
·         In simple terms, ASP.NET routing is just a pattern-matching system. At startup, the application registers one or more patterns with the framework’s route table to tell the routing system what to do with any requests that match those patterns.
·         When the routing engine receives a request at runtime, it matches that request’s URL against the URL patterns registered with it (Figure 1-6).
·         When the routing engine finds a matching pattern in its route table, it forwards the request to the appropriate handler for that request.
Otherwise, when the request’s URL does not match any of the registered route patterns, the routing engine indicates that it could not figure out how to handle the request by returning a 404 HTTP status code.
Configuring Routes
ASP.NET MVC routes are responsible for determining which controller method (otherwise known as a controller action) to execute for a given URL. They consist of the following properties:
Unique name : A name may be used as a specific reference to a given route
URL pattern : A simple pattern syntax that parses matching URLs into meaningful 
segments

   
                                                         Figure 1-6. ASP.NET routing
Defaults : An optional set of default values for the segments defined in the URL pattern Constraints
A set of constraints to apply against the URL pattern to more narrowly define the URLs that it matches
The default ASP.NET MVC project templates add a generic route that uses the following URL convention to break the URL for a given request into three named segments, wrapped with brackets ({}):
 “controller”, “action”, and “id”: {controller}/{action}/{id} This route pattern is registered via a call to the MapRoute() extension method that runs during application startup (located in App_Start/RouteConfig.cs):
routes.MapRoute(
"Default", // Route name
"{controller}/{action}/{id}", // URL with parameters
new { controller = "Home", action = "Index",
id = UrlParameter.Optional } // Parameter defaults
);
In addition to providing a name and URL pattern, this route also defines a set of default parameters to be used in the event that the URL fits the route pattern, but doesn’t actually provide values for every segment.
For instance, Table 1-1 contains a list of URLs that match this route pattern, along with corresponding values that the routing framework will provide for each of them.

Table 1-1. Values provided for URLs that match our route pattern
URL                                        Controller                               Action                         ID
/auctions/auction/1234             AuctionsController                      Auction              1234
/auctions/recent                        AuctionsController                      Recent
/auctions                                  AuctionsController                      Index
/                                               HomeController                         Index

·         The first URL (/auctions/auction/1234) in the table is a perfect match because it satisfies every segment of the route pattern, but as you continue down the list and remove segments from the end of the URL, you begin to see defaults filling in for values that are not provided by the URL.
·         This is a very important example of how ASP.NET MVC leverages the concept of convention over configuration: when the application starts up, ASP.NET MVC discovers all of the application’s controllers by searching through the available assemblies for classes that implement the System.Web.Mvc.IController interface (or derive from a class that implements this interface, such as System.Web.Mvc.Controller) and whose class names end with the suffix Controller.
·         When the routing framework uses this list to figure out which controllers it has access to, it chops off the Controller suffix from all of the controller class names.
·         So, whenever you need to refer to a controller, you do so by its shortened name, e.g.,  AuctionsController is referred to as Auctions, and Home Controller becomes Home.
·         What’s more, the controller and action values in a route are not case-sensitive. This means that each of these requests—/Auctions/Recent, /auctions/Recent, /auctions/recent, or even /aucTionS/rEceNt—will successfully resolve to the Recent action in the AuctionsController.
·         Note: URL route patterns are relative to the application root, so they do not need to start with a forward slash (/) or a virtual path designator (~/).
·         Route patterns that include these characters are invalid and will cause the routing system to throw an exception.
·         As you may have noticed, URL routes can contain a wealth of information that the routing engine is able to extract.
·         In order to process an ASP.NET MVC request, however, the routing engine must be able to determine two crucial pieces of information: the controller and the action.

·         The routing engine can then pass these values to the ASP.NET MVC runtime to create and execute the specified action of the appropriate controller.

Tuesday 15 July 2014

Modifying our first MVC 4 Web Application


Apart from the generated code I’m just going to add some more pieces to this MVC Web Application. I will be publishing a full fledge ePhoneBook on ASP.NET MVC 4 later. This sample code will help you to get more understanding on MVC 4.
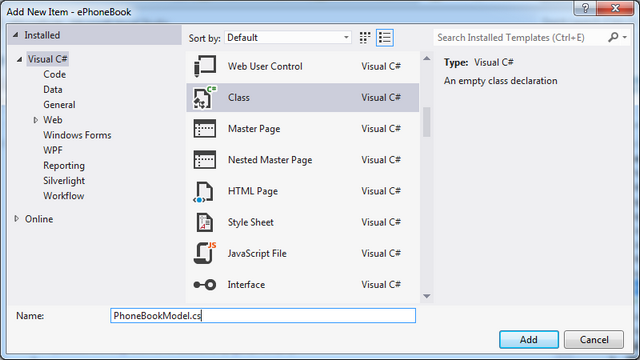
The first thing I’m going to do is adding a PhoneBook Model class .
Adding MVC Model
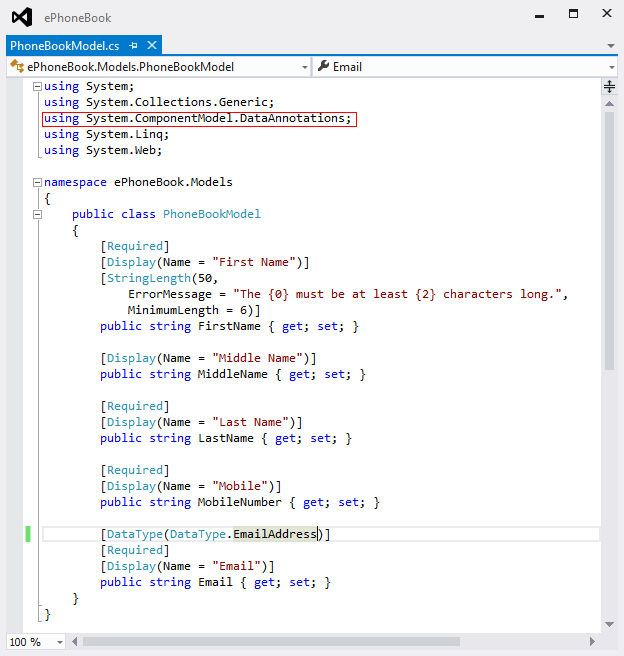
I have changed the PhoneBookModel code as below,
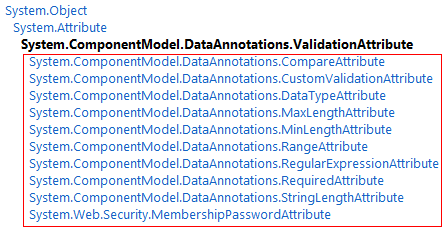
In this class I have mentioned the validation attribute for the elements. The ValidationAttributes are comes fromSystem.ComponentModel.DataAnnotations. There are multiple validation attributes available and all are self-descriptive.
The above image shows the available validation attributes. Read More on Validation Attribute from MSDN.
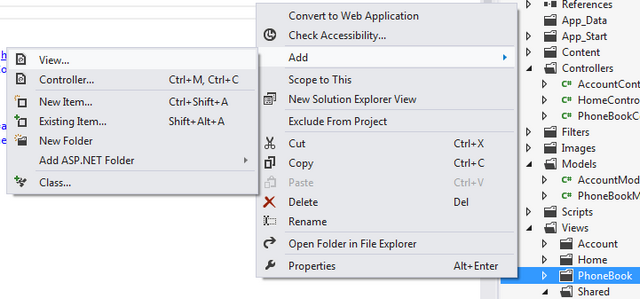
Now let’s add required views (Create, Edit, Delete, Details, List), to add the views just right click on the View folder and click on Add --> Views menu.
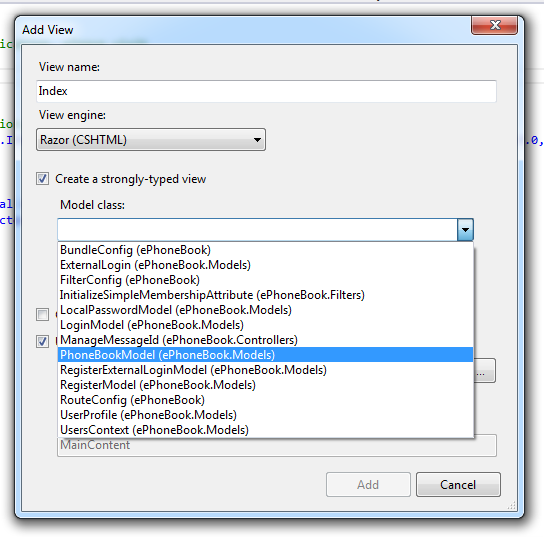
Now I’m going to add the Listing view, I have given the View Name as “Index” and selected the 'create a strongly typed view' Model from the Drop-down so that the code will be generated accordingly to the Model. If the created PhoneBookModel is not showing in the dropdown then build the application and then check.
select typed model - view mvc
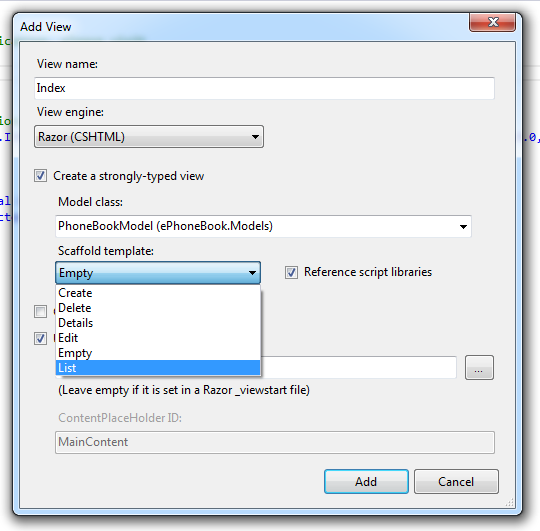
Now we can specify which scaffolding template to use so that the code will be generated as per the template , I have selected “List” template like below
When you click on ‘OK’ button the Index.cshtml is ready.
The same way I have added all files for this sample project
The details page looks like
If you look at the code from Create template all validations are in place
Now we need to add Controller actions for these scaffolding items.
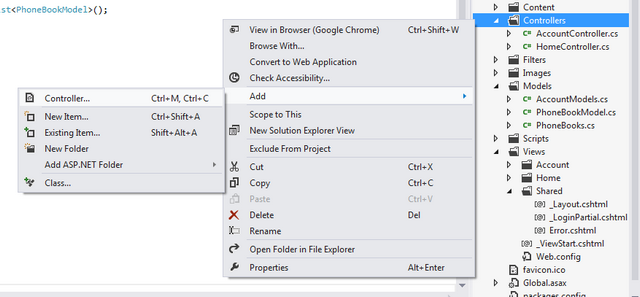
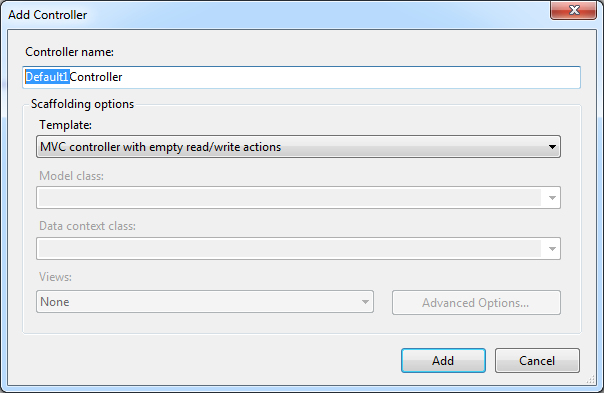
Click on the Add --->Controller menu, once you have clicked on that menu then a popup will be shown like below ,
There are multiple controller templates available in this dialogue box
  • Empty MVC controller
  • MVC controller with read/write actions and views, using Entity Framework
  • MVC controller with empty read/write actions
  • Empty API controller
  • API controller with read/write actions and views, using Entity Framework
  • API controller with empty read/write actions
I choosed “MVC controller with empty read/write actions” controller template Now give the controller name as PhoneBookController. Note that MVC requires the name of all controllers to end with "Controller".
Click on “Add” button to add the controller to our application, now the controller file is created as per our template selection and added to our project, click here to see the generated file
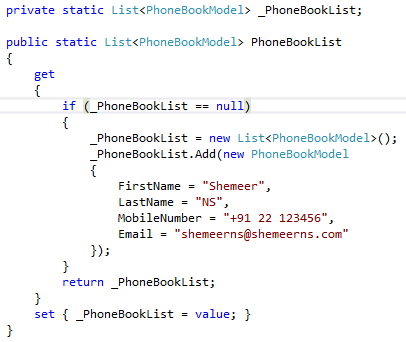
Now I’m going to modify the newly added controller file, the first thing I have added a property that will have a default values for the ePhoneBook
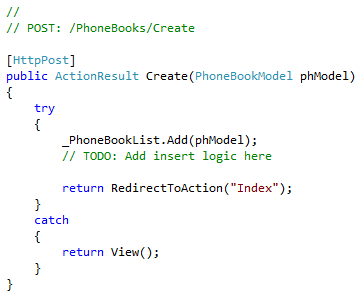
After that I have modified the Created method same as below,
Create Action MVC
If you see this method the return type is ActionResult, What’’s ActionResult. An action result represents a command that the framework will perform on behalf of the action method. The ActionResult class is the base class for action results. It Encapsulates the result of an action method and is used to perform a framework-level operation on behalf of the action method.
  • ContentResult
  • EmptyResult
  • FileResult
    • FileContentResult
    • FilePathResult
    • FileStreamResult
  • HttpUnauthorizedResult
    • HttpUnauthorizedResult
    • HttpNotFoundResult
  • JavaScriptResult
  • JsonResult
  • RedirectResult
  • RedirectToRouteResult
  • ViewResultBase
  • PartialViewResult
  • ViewResult
Read more from MSDN
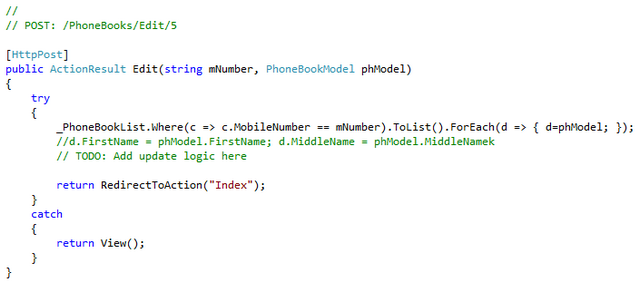
lets come back to our application, The same way I have updated the Edit also
The above code will return the data for selected entry by the mobile number, Onceyou click on update button in edit page the below method will get called
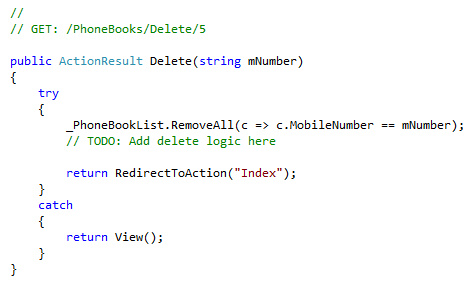
For the “Delete” method we don’t have any special User Interface that’s whyonce the entry is deleted we are returning the “Index”view.
Delete Action MVC
The “Details” method is written as below
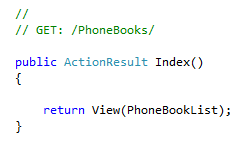
The “Index” page will display the data from the below code
Layout menu mvc
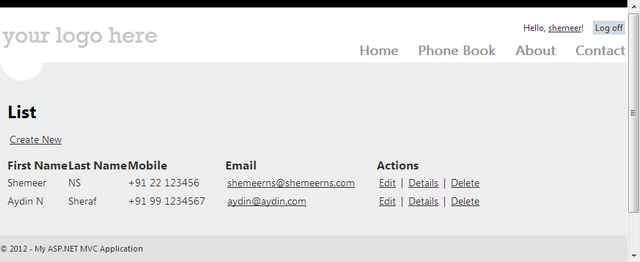
I have added a menu for Phone Book in _Layout.cshtml. Once this all done let’s “Run” our modified application,
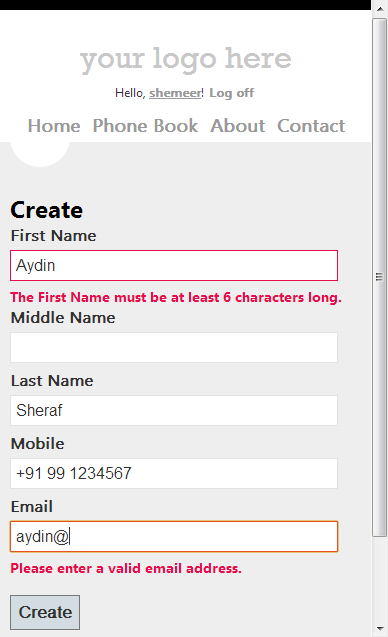
When you click on the “Create New” the below page will be shown
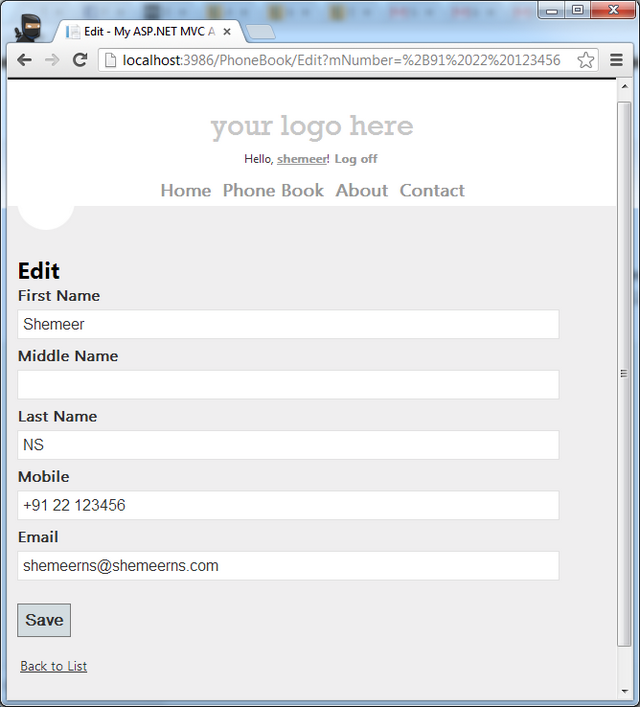
Edit page looks like below, all validations are working as per the validation attributesin model.

Running Our First MVC 4 Application

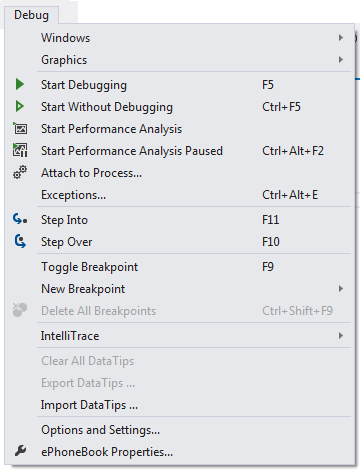
Now we will run our newly created ePhoneBook application. We can run this in debug mode or without debug. To run this go to the Menu Debug -->Start Debugging/Start without debugging.

F5 - run application
You can also use the shortcut key F5 / Ctrl + F5 to run this application
The run command is also there in the Standard Toolbar, the below given image shows the run toolbar in VS 2012 IDE.
F5 - running web application
The below given image shows the run command in standard toolbar of VS 2010
F5 - running web application
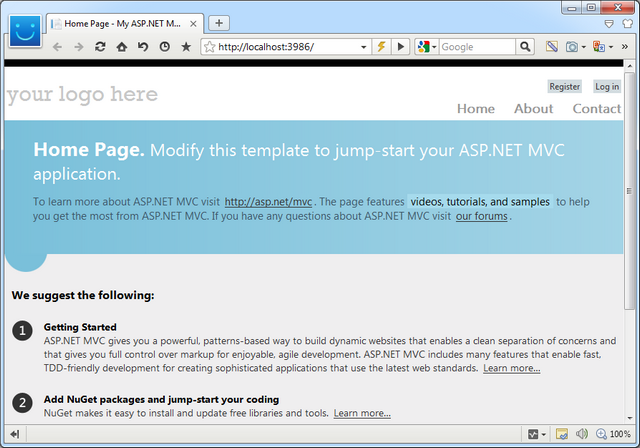
Once you have run the application you can see the below Home page
First MVC 4 Web Application
If you want to debug your application then you need to set a break-point at the location where you want to hit the debugger.
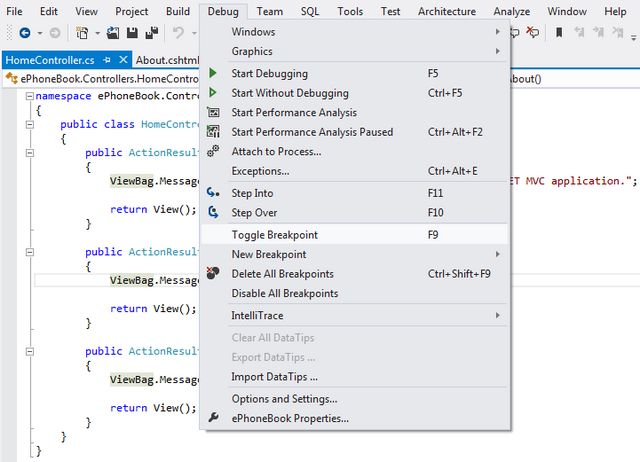
To set breakpoints just go to the menu Debug -->Toggle Breakpoint.
visual studio - break point
You can use the shortcut key F9 also for the same. you might want to note the short keys for Step Into (F11) and Step Over (F10). Once you hit the breakpoint you can resume debugging by pressing F5.
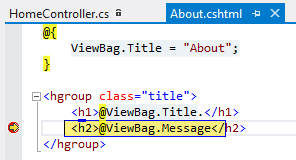
To demonstrate the debugging I have placed two breakpoints, one in Home Controller – About() and About.cshtml. When I clicked on About Menu the first break point got hit.
You can Step Over by F10 or just resume to the next breakpoint by F5. I pressed F5 and the second breakpoint got hit.
debugging MVC 4 Web Application
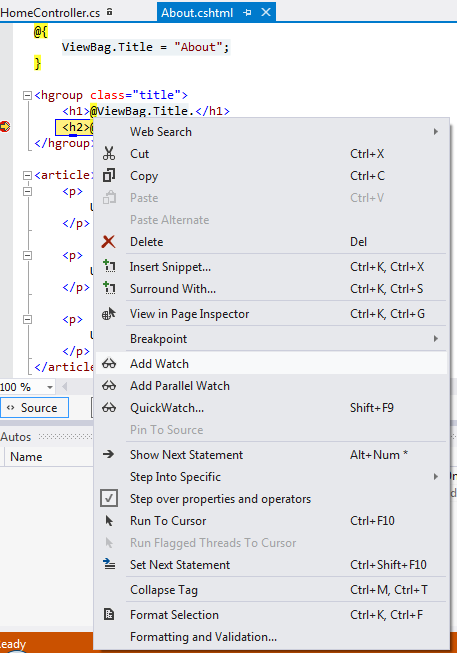
If you want see the value then you can see in watch window and also there are other windows too, to add a object to Watch Window, select the required object and right click and click on AddWatch.
Add Watch - visual studio
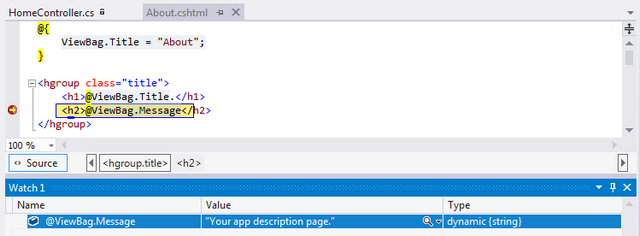
Once you have placed the object in Watch window you can see the current value in that window
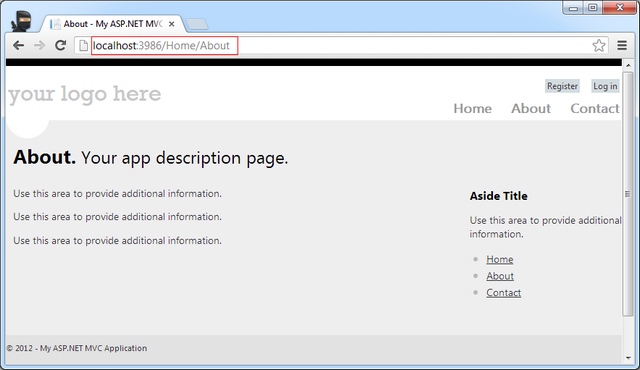
If you resume your breakpoints you can see the About page in action,
MVC 4 Url routing
Have you noticed that the url is very user friendly with no extensions and all. The ASP.NET MVC routing takes care of this URL routing. Read more on routing on MSDN.
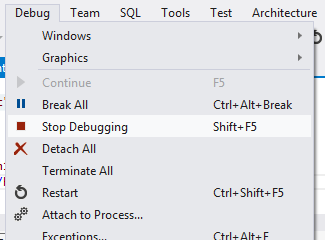
To stop debugging you need to press Shift + F5 or go to the Debug menu and click on Stop Debugging.
stop debugging - visual studio
Stopping Debugging from the standard toolbar
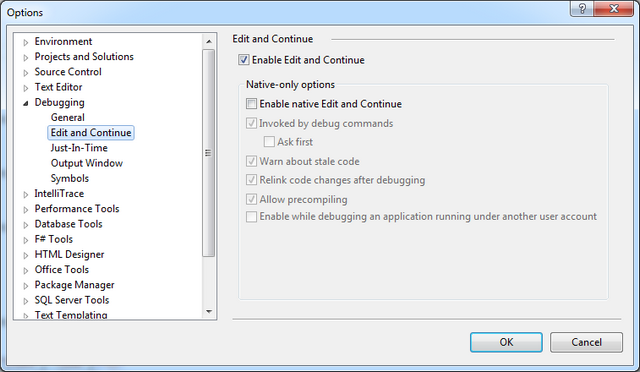
If you want to make any changes while debugging then you can edit and continue the application, if that option is enabled. to check this option is enabled or not, go to Tools->Options then
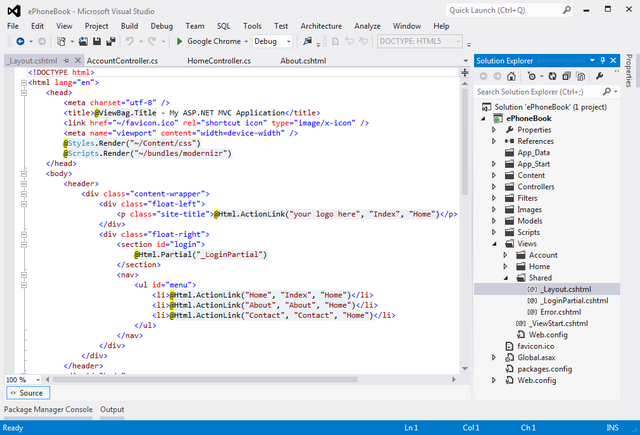
In ASP.MVC, Layout is used to give similar look and feel for the entire application this was called master page in ASP.NET Web forms. Below given the Layout page in our application,
You can see that the Menus like Home, About Contact was shown from this Layout. So how this page is called? So where the content page is placed, it’s simple, the @RenderBody mentioned that the content page will be displayed in that area.

Content place holder asp.net mvc layout master page
This Layout can be mentioned in individual views or in _viewstart file. The ViewStart file called the Layout in below syntax,
While debugging our application we have noticed something named ViewBag. It's a dynamic data dictionary.
As we have used Internet Application Project template the code is generated with Membership management. Let’s have a look into that.


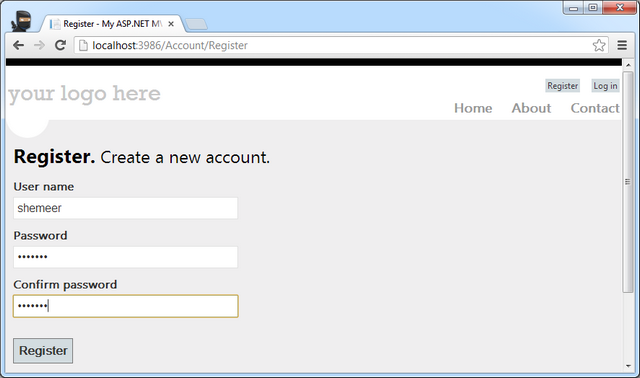
Now I’m going to create a User named Shemeer using the Register link.
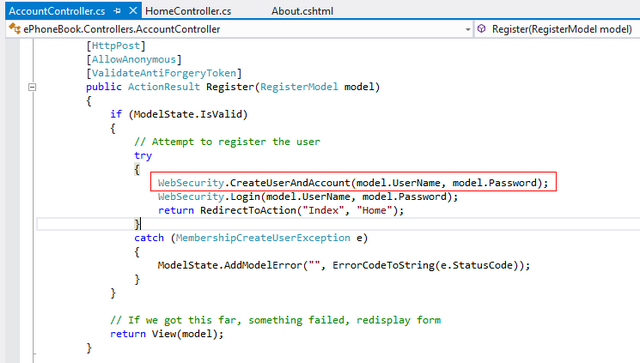
If you want you can place a breakpoint on AccountController’s register action. When I click ‘Register’ Button it reaches the WebSecurity.CreateUserAndAccount().
membership creation mvc
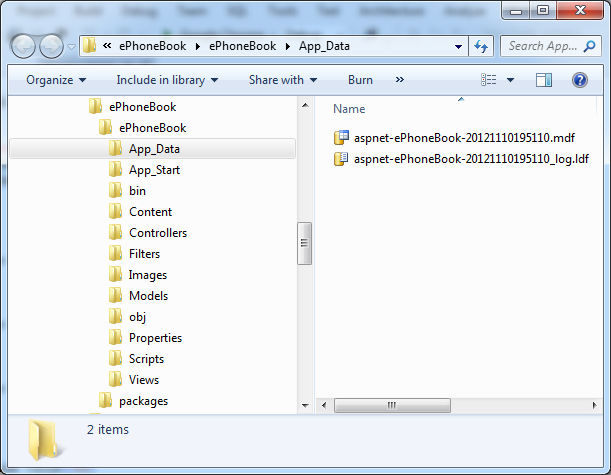
This method saves my credential to the aspnet* database. Wondering J this database was created automatically as part of memebership management and this database by default resides under the App_Data folder.
And the connection string has been created inside the web.config also
aspnet db con str
Now I'm trying to login using the Login page
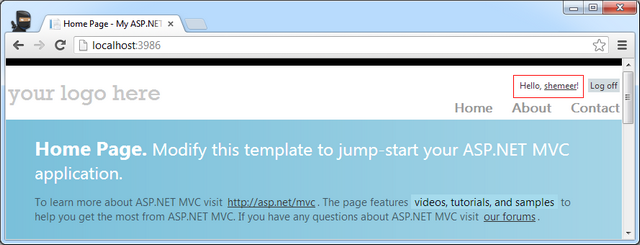
I’m able to login and my user name is showing in right top corner as logged in