Friday 18 July 2014

Routing MVC 4

Routing
·         All ASP.NET MVC traffic starts out like any other website traffic: with a request to a URL. This means that, despite the fact that it is not mentioned anywhere in the name, the ASP.NET Routing framework is at the core of every ASP.NET MVC request.
·         In simple terms, ASP.NET routing is just a pattern-matching system. At startup, the application registers one or more patterns with the framework’s route table to tell the routing system what to do with any requests that match those patterns.
·         When the routing engine receives a request at runtime, it matches that request’s URL against the URL patterns registered with it (Figure 1-6).
·         When the routing engine finds a matching pattern in its route table, it forwards the request to the appropriate handler for that request.
Otherwise, when the request’s URL does not match any of the registered route patterns, the routing engine indicates that it could not figure out how to handle the request by returning a 404 HTTP status code.
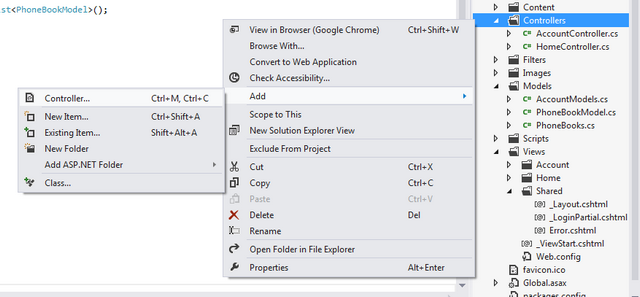
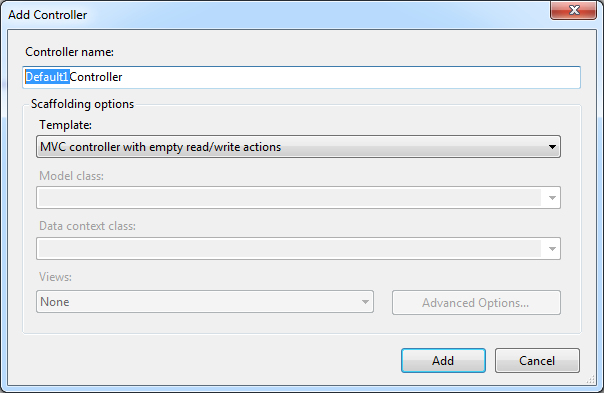
Configuring Routes
ASP.NET MVC routes are responsible for determining which controller method (otherwise known as a controller action) to execute for a given URL. They consist of the following properties:
Unique name : A name may be used as a specific reference to a given route
URL pattern : A simple pattern syntax that parses matching URLs into meaningful 
segments

   
                                                         Figure 1-6. ASP.NET routing
Defaults : An optional set of default values for the segments defined in the URL pattern Constraints
A set of constraints to apply against the URL pattern to more narrowly define the URLs that it matches
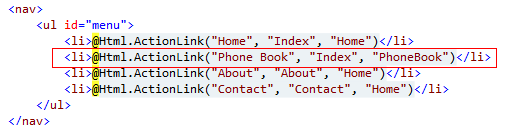
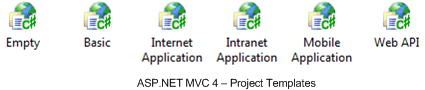
The default ASP.NET MVC project templates add a generic route that uses the following URL convention to break the URL for a given request into three named segments, wrapped with brackets ({}):
 “controller”, “action”, and “id”: {controller}/{action}/{id} This route pattern is registered via a call to the MapRoute() extension method that runs during application startup (located in App_Start/RouteConfig.cs):
routes.MapRoute(
"Default", // Route name
"{controller}/{action}/{id}", // URL with parameters
new { controller = "Home", action = "Index",
id = UrlParameter.Optional } // Parameter defaults
);
In addition to providing a name and URL pattern, this route also defines a set of default parameters to be used in the event that the URL fits the route pattern, but doesn’t actually provide values for every segment.
For instance, Table 1-1 contains a list of URLs that match this route pattern, along with corresponding values that the routing framework will provide for each of them.

Table 1-1. Values provided for URLs that match our route pattern
URL                                        Controller                               Action                         ID
/auctions/auction/1234             AuctionsController                      Auction              1234
/auctions/recent                        AuctionsController                      Recent
/auctions                                  AuctionsController                      Index
/                                               HomeController                         Index

·         The first URL (/auctions/auction/1234) in the table is a perfect match because it satisfies every segment of the route pattern, but as you continue down the list and remove segments from the end of the URL, you begin to see defaults filling in for values that are not provided by the URL.
·         This is a very important example of how ASP.NET MVC leverages the concept of convention over configuration: when the application starts up, ASP.NET MVC discovers all of the application’s controllers by searching through the available assemblies for classes that implement the System.Web.Mvc.IController interface (or derive from a class that implements this interface, such as System.Web.Mvc.Controller) and whose class names end with the suffix Controller.
·         When the routing framework uses this list to figure out which controllers it has access to, it chops off the Controller suffix from all of the controller class names.
·         So, whenever you need to refer to a controller, you do so by its shortened name, e.g.,  AuctionsController is referred to as Auctions, and Home Controller becomes Home.
·         What’s more, the controller and action values in a route are not case-sensitive. This means that each of these requests—/Auctions/Recent, /auctions/Recent, /auctions/recent, or even /aucTionS/rEceNt—will successfully resolve to the Recent action in the AuctionsController.
·         Note: URL route patterns are relative to the application root, so they do not need to start with a forward slash (/) or a virtual path designator (~/).
·         Route patterns that include these characters are invalid and will cause the routing system to throw an exception.
·         As you may have noticed, URL routes can contain a wealth of information that the routing engine is able to extract.
·         In order to process an ASP.NET MVC request, however, the routing engine must be able to determine two crucial pieces of information: the controller and the action.

·         The routing engine can then pass these values to the ASP.NET MVC runtime to create and execute the specified action of the appropriate controller.

Tuesday 15 July 2014

Modifying our first MVC 4 Web Application


Apart from the generated code I’m just going to add some more pieces to this MVC Web Application. I will be publishing a full fledge ePhoneBook on ASP.NET MVC 4 later. This sample code will help you to get more understanding on MVC 4.
The first thing I’m going to do is adding a PhoneBook Model class .
Adding MVC Model
I have changed the PhoneBookModel code as below,
In this class I have mentioned the validation attribute for the elements. The ValidationAttributes are comes fromSystem.ComponentModel.DataAnnotations. There are multiple validation attributes available and all are self-descriptive.
The above image shows the available validation attributes. Read More on Validation Attribute from MSDN.
Now let’s add required views (Create, Edit, Delete, Details, List), to add the views just right click on the View folder and click on Add --> Views menu.
Now I’m going to add the Listing view, I have given the View Name as “Index” and selected the 'create a strongly typed view' Model from the Drop-down so that the code will be generated accordingly to the Model. If the created PhoneBookModel is not showing in the dropdown then build the application and then check.
select typed model - view mvc
Now we can specify which scaffolding template to use so that the code will be generated as per the template , I have selected “List” template like below
When you click on ‘OK’ button the Index.cshtml is ready.
The same way I have added all files for this sample project
The details page looks like
If you look at the code from Create template all validations are in place
Now we need to add Controller actions for these scaffolding items.
Click on the Add --->Controller menu, once you have clicked on that menu then a popup will be shown like below ,
There are multiple controller templates available in this dialogue box
  • Empty MVC controller
  • MVC controller with read/write actions and views, using Entity Framework
  • MVC controller with empty read/write actions
  • Empty API controller
  • API controller with read/write actions and views, using Entity Framework
  • API controller with empty read/write actions
I choosed “MVC controller with empty read/write actions” controller template Now give the controller name as PhoneBookController. Note that MVC requires the name of all controllers to end with "Controller".
Click on “Add” button to add the controller to our application, now the controller file is created as per our template selection and added to our project, click here to see the generated file
Now I’m going to modify the newly added controller file, the first thing I have added a property that will have a default values for the ePhoneBook
After that I have modified the Created method same as below,
Create Action MVC
If you see this method the return type is ActionResult, What’’s ActionResult. An action result represents a command that the framework will perform on behalf of the action method. The ActionResult class is the base class for action results. It Encapsulates the result of an action method and is used to perform a framework-level operation on behalf of the action method.
  • ContentResult
  • EmptyResult
  • FileResult
    • FileContentResult
    • FilePathResult
    • FileStreamResult
  • HttpUnauthorizedResult
    • HttpUnauthorizedResult
    • HttpNotFoundResult
  • JavaScriptResult
  • JsonResult
  • RedirectResult
  • RedirectToRouteResult
  • ViewResultBase
  • PartialViewResult
  • ViewResult
Read more from MSDN
lets come back to our application, The same way I have updated the Edit also
The above code will return the data for selected entry by the mobile number, Onceyou click on update button in edit page the below method will get called
For the “Delete” method we don’t have any special User Interface that’s whyonce the entry is deleted we are returning the “Index”view.
Delete Action MVC
The “Details” method is written as below
The “Index” page will display the data from the below code
Layout menu mvc
I have added a menu for Phone Book in _Layout.cshtml. Once this all done let’s “Run” our modified application,
When you click on the “Create New” the below page will be shown
Edit page looks like below, all validations are working as per the validation attributesin model.

Running Our First MVC 4 Application

Now we will run our newly created ePhoneBook application. We can run this in debug mode or without debug. To run this go to the Menu Debug -->Start Debugging/Start without debugging.

F5 - run application
You can also use the shortcut key F5 / Ctrl + F5 to run this application
The run command is also there in the Standard Toolbar, the below given image shows the run toolbar in VS 2012 IDE.
F5 - running web application
The below given image shows the run command in standard toolbar of VS 2010
F5 - running web application
Once you have run the application you can see the below Home page
First MVC 4 Web Application
If you want to debug your application then you need to set a break-point at the location where you want to hit the debugger.
To set breakpoints just go to the menu Debug -->Toggle Breakpoint.
visual studio - break point
You can use the shortcut key F9 also for the same. you might want to note the short keys for Step Into (F11) and Step Over (F10). Once you hit the breakpoint you can resume debugging by pressing F5.
To demonstrate the debugging I have placed two breakpoints, one in Home Controller – About() and About.cshtml. When I clicked on About Menu the first break point got hit.
You can Step Over by F10 or just resume to the next breakpoint by F5. I pressed F5 and the second breakpoint got hit.
debugging MVC 4 Web Application
If you want see the value then you can see in watch window and also there are other windows too, to add a object to Watch Window, select the required object and right click and click on AddWatch.
Add Watch - visual studio
Once you have placed the object in Watch window you can see the current value in that window
If you resume your breakpoints you can see the About page in action,
MVC 4 Url routing
Have you noticed that the url is very user friendly with no extensions and all. The ASP.NET MVC routing takes care of this URL routing. Read more on routing on MSDN.
To stop debugging you need to press Shift + F5 or go to the Debug menu and click on Stop Debugging.
stop debugging - visual studio
Stopping Debugging from the standard toolbar
If you want to make any changes while debugging then you can edit and continue the application, if that option is enabled. to check this option is enabled or not, go to Tools->Options then
In ASP.MVC, Layout is used to give similar look and feel for the entire application this was called master page in ASP.NET Web forms. Below given the Layout page in our application,
You can see that the Menus like Home, About Contact was shown from this Layout. So how this page is called? So where the content page is placed, it’s simple, the @RenderBody mentioned that the content page will be displayed in that area.

Content place holder asp.net mvc layout master page
This Layout can be mentioned in individual views or in _viewstart file. The ViewStart file called the Layout in below syntax,
While debugging our application we have noticed something named ViewBag. It's a dynamic data dictionary.
As we have used Internet Application Project template the code is generated with Membership management. Let’s have a look into that.


Now I’m going to create a User named Shemeer using the Register link.
If you want you can place a breakpoint on AccountController’s register action. When I click ‘Register’ Button it reaches the WebSecurity.CreateUserAndAccount().
membership creation mvc
This method saves my credential to the aspnet* database. Wondering J this database was created automatically as part of memebership management and this database by default resides under the App_Data folder.
And the connection string has been created inside the web.config also
aspnet db con str
Now I'm trying to login using the Login page
I’m able to login and my user name is showing in right top corner as logged in

MVC -4 View Engine

View Engine are responsible for rendering the HTML from your views to the browser. The view engine template will have different syntax for implementation. Currently there are few number of view engines available for MVC and the top four view engines are Razor, traditional ASPX, Spark and NHaml. I have written another article on comparison of different view engines.
Razor is the preferred View Engine for MVC, ASPX View Engine is the legacy View Engine and this option is there for backward compatibility.
MVC View Engine
I will be explaining more about Razor on another article.
Once you click 'OK' after selecting the appropriate project template Visual Studio will create a MVC Web Application project with default files and folders as per the Template Selection.
If look at the visual studio status bar you can see that the project creation progress and the files adding to the project. ASP.NET MVC 4 project template is using Nuget Package Manager to install and manage the assembly references in your application. the below files in status bar adding by Nuget.
Package.Config File contains the list of the Nuget Package used in this project.

Now Visual Studio created our project in place and the solution file looks like , 
MVC Web Application
I have explained the Project Items/ Application folder structure in another article, before continuing with our newly created project I just wanted to explain the Project Templates.

Project Templates

Currently MVC 4 Application in Visual Studio 2010 and Visual Studio 2012 offers 6 different types of project templates. (Previously it was 7 but the final version of MVC 4 doesn't shipped with ASP.NET Single Page Application due to some compatibility)
I will be explaining the Basic, Empty, Internet Application, Intranet Application, Mobile Application and Web API project templates here.
Empty
The Empty template created the minimum references and resources required to run an Asp.net MVC application.As you can see in below image, Models, Controllers, App_Data are completely empty folders and View folder only contains web.config and a Global.asax file and web.config.App_Start folder contains 3 configuration files ( FilterConfig.cs, RouteConfige.cs and WebApiConfig.cs ).
This option will be good if you plan to create everything from scratch.
After comparing the Empty project image and Basic project image we can say that The Basic template is somewhat similar to Empty template. In addition to the Empty project , Content , Script folder are present in this template and Shared folder is present inside Views and also in App_Start folder apart from the three files in empty template, basic template added one more file named BundleConfig.cs (Bundling and minimization).
Same like Empty Template,this option also good if you plan to create everything from scratch.
Internet Application
The Internet Application extends Basic Template with two controllers( Account controller and Home controller) with all the logic and functionality implemented in actions and views. In this template membership management functionality gives the option to user to register and login, change password etc in the website.
It's a template used usually to start a normal web project in action.
Intranet Application
The Intranet Application template is same like the Internet Application template, except that it is preconfigured to use Windows-based authentication.
This template will be a good option if you plan to create an intranet web site.
Mobile Application
The Mobile Application template is another variation of the Internet Application template. This template, however, is optimized for mobile devices and includes the jQuery Mobile JavaScript framework and views that apply the HTML that works best with jQuery Mobile.
If you plan to target touch based mobile devices then this template is the right option.
The Web API template is yet another variation of the Internet Application template that includes a preconfigured Web API controller.ASP.NET Web API is a framework that makes it easy to build HTTP services that reach a broad range of clients, including browsers and mobile devices. ASP.NET Web API is an ideal platform for building RESTful applications on the .NET Framework.
Web API is a great choice for quickly and easily creating data services that your AJAX-enabled applications can easily consume.
If we want to create a Test project while creating the MVC project itself then we need to mark the Create Unit Test Project Check box. If you don't want to do this at the first time you can add a unit test project later also.
If we are creating MVC Application with Test project then the solution explorer will look like below .